
11 Tips for Better Product Photos
I love building online shops. Every shop I build is a challenge and an adventure, but all that fun can quickly turn into a major headache when we start talking about product photos.
So many people are sure that an online shop will help them take their products to the world, but they don’t stop and think about the photos that will be needed to display their products.
In fact, many of them think that providing product photos is what their web designer should be doing, and they become totally confused when I suggest that it’s really their job to come up with the photos.
Of course I always want to help people so over the years Stuart and I have done the product photos for many clients and we have shot everything from tiny pieces of gold to computer parts and in between we’ve photographed jewellery, Christmas decorations, pizza, car trailers, vacuum cleaners, sun glasses, women’s fashion, educational toys and a whole lot more.
We’ve even sent a friend who usually takes great sunrise and sunset photos, up in a cherry-picker in an attempt to get the “perfect” product photo.
From all that experience comes these 11 tips that will help you produce better product photos for your online shop.
#1 Don’t rely on product photos from your supplier or manufacturer.
Some suppliers don’t have images … some suppliers won’t give you permission to use their images … some suppliers have images and give you permission to use them but all too often their photos are too small or too blurry.
You might wonder why that is so but it seems that selling to a retailer is easier than selling to a customer who probably won’t make a purchase if the product images are poor.
#2 Don’t settle for anything but the best photos.
Poor photos won’t sell your products so don’t settle for anything but the best photos you can take … and set your camera to take the biggest physical size photos too.
Little photos won’t sell your products either so take big photos and use some image software to reduce them to the size that works with your online shop.
#3 Take multiple photos of each product
The cost of digital photos is almost zero so don’t be afraid to take lots of photos.
Of course, you should be taking a series of photos of each product so that an online shopper can see what the product looks like from front, side, and rear … and even top and bottom … but don’t take just 1 photo from each angle.
You should take several photos from each angle. You never know when the slightest bump or shake might make a photo unusable and if that’s the only photo you have …
If you are someone who likes to set their own exposure times and colour balance, then here is a little tip from a magazine photographer who worked in the days before digital cameras – take a photo with the settings you want but also take a photo that is one step forward and one step back from those settings.
You might think that you have the perfect settings but sometimes conditions change and your settings stop being perfect.
#4 Use a tripod.
It doesn’t matter if your shooting a huge bulldozer or the tiniest fleck of gold … use a tripod.
Modern digital cameras have stability controls built in but they’re not infallible and there is nothing worse than spending a whole afternoon shooting products and then going back and reshooting them because your hands were shaking as you took the photos.
That’s definitely something to remember if you’re a little older. We might all age like fine wine, but fine wine can’t hold a camera still.
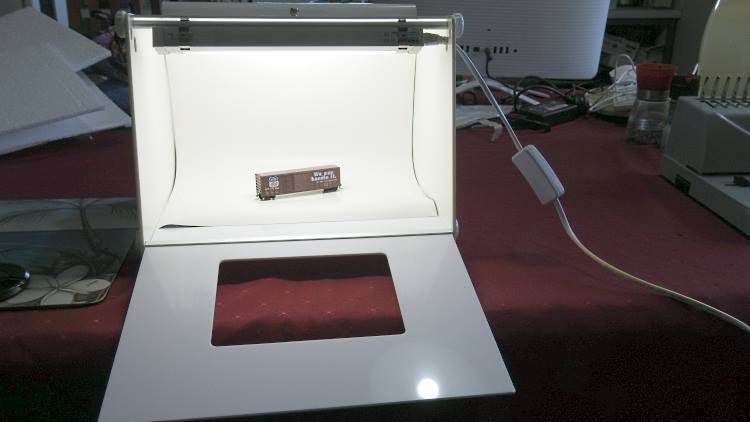
#5 Use a lightbox for smaller items
The very first product photos that we ever shot was for my partner’s own online store that sold computer mice. We struggled to get the lighting right and wasted so much time until we bought a lightbox.
They are not expensive, they are easy to use, and the best ones can take away almost all shadows that can really spoil a photo.
#7 Stage each product against a plain background …
… and try not to change that background too often.
You may not think that the background could make all that much difference, but it does and it will be distracting in your online shop if there are multiple background colours in each category.
We prefer to use a white background made from paper or thin card when we’re shooting small products. You can use any colour you want but make sure it is paper or thin card … we learned that lesson the hard way.
Stuart shot around 400 photos of small gold flecks set against a very black and very dense piece of foam. To the human eye it looked as smooth and solid as a table top.
Everything looked good when he reviewed the photos in the camera but once we saw them full size on the computer screen we soon realised that the background wasn’t so dense … or black.
You need to think about backgrounds for bigger subjects too. Sometimes the background can be more interesting than the foreground if you’re shooting a really big item outdoors.
You should always be looking through the viewfinder to see exactly what the camera is seeing before you take a photo because sometimes the camera will see things that you don’t see.
#6 Don’t use a flash.
Yes, you may have seen professional photographers using a flash … or even a series of flash lights that are set to all fire at once … when they are shooting product photos. But you won’t get the same result and the shadows produced by a single flash will ruin your photo.
If you’re product won’t fit in a lightbox and you can’t shoot it outdoors in natural light, then invest in a couple of small photographic lights and make sure that they are not a harsh directional light.
We bought a small table-top one recently for around $50 that is adjustable. At one end of its settings it gives a nice, gentle diffused light that is perfect for product photography.
#7 Use a camera that is fit for the purpose.
A couple of years ago we sold our old DSLR cameras that produced great product photos and replaced them with a couple of hi-tech units that people were raving about.
Unfortunately, while those cameras are great for indoor and outdoor action and scenery photography they are not so good for small product photography. They still do the job but the cameras we sold did a better job.
Smaller, less expensive digital cameras can produce great results too but an old, cheap, camera is not going to produce images that have the same quality.
Don’t overlook your mobile phone either. The cameras in the latest mobile phone releases can do a great job and you can buy a special mounting that will let you mount them on a full-size tripod.
#8 Start the shoot with a fully charged battery in your camera …
… and have a spare fully charged battery within easy reach.
Modern digital camera batteries last a long time, but you don’t want to be halfway through a shoot and find that the battery in your camera just died and you’re going to have to wait till it’s re-charged.
#9 Stop your camera from turning itself off.
One of the biggest pains in the butt is to have a camera that continually turns itself off … or goes into power-saving mode … while you’re setting up the next shot.
Groans of annoyance when that happens will quickly turn to words that would shock your mother as the shoot goes on.
Check your camera settings to see if you can turn that feature off or extend the time it takes to go into power-saving mode while you’re shooting products.
#10 Give yourself plenty of uninterrupted time
Never rush a product shoot and never underestimate the time that it will take you to get the job done.
And turn your phone off too. There is nothing worse than having your phone ring just as your about to take a photo or struggling to set a product up in your lightbox.
A rushed or interrupted job shows in the end results.
#11 Set yourself up for comfort
Don’t try and work in cramped conditions … especially if you’re going to be working for hours … and try to have everything set up so that you don’t have to bend over all the time.
Bending over the lightbox to set up the next product and then bending over the camera to make sure everything is right before you take the photo grows old very quickly.
Backpain can really influence the quality of your work and totally spoil the rest of your day.
There’s a whole lot more we could say about achieving good results with your product photography, but 11 tips should be enough to help you get started.
You can do it yourself and if you can’t you need to be prepared to pay a lot for a good professional.