Change Media Upload Limit

A few moments ago I had a client call asking how he could upload a file that was 53MB+ in size when his upload limit was something like 2 or 8 MB. There are various ways to do things but I like to try and do things with minimal stress especially when I know it works.
So until the makers of WordPress add a feature within the admin to allow us to set the required size, I add a few lines to the .htaccess file which works well.

It’s quite easy really open up your.htaccess file in your favourite text program such as Dreamweaver… Most users of WP will have a .htaccess file for their permalinks..

Increase media upload
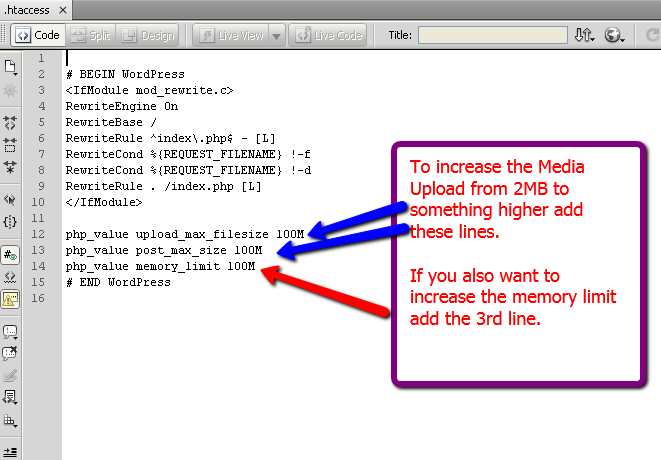
Ok.. with the file open, add these two lines:

php_value upload_max_filesize 100M
php_value post_max_size 100M

If you want to increase the memory limit add this line below the two lines above.
php_value memory_limit 100M

Save your .htaccess file and upload. Head into the admin area of the WordPress site you are working on and check to see if your MB Limit has changed.

increase-media-upload-changed
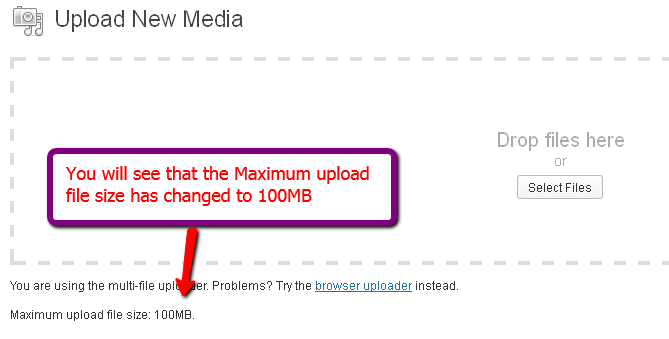
Go to your Media area and click on Add New. Look down the bottom so that you see if the Maximum upload limit has been increased.

July 26th, 2014|Wordpress Tutorials|

Hiding Attribute Link Titles

I had a client ask this morning how to stop the ‘link titles’ from appearing when you hover over a link on his website. He found it very annoying and believed others would too.
After looking around the net for a solution – this took several hours, I discovered various options that were certainly very outdated and Google really couldn’t give me a solution that was for 2012/ 2013… however…

I finally found a solution and it’s all in the form of a piece of Javascript and it works a treat. Once again I am not sure why anyone would want to hide those title links but sometimes when a client stresses they want it removed…. we go with what the customer wants.


Remove Title Attribute<script type=”text/javascript”>
window.onload = function() {
var alinks = document.getElementsByTagName(“a”);
for (var i = 0; i < alinks.length; i++) {
alinks[i].removeAttribute(“title”);
}
}
</script>

This is the scripting you need and for a site built using WordPress you would open up the header.php page of your theme and insert the coding before the closing head tag </head> – this means it will be effective on all pages..

Please be aware that my client was using Chrome and before I added this piece of coding, seeing the Link Titles was not showing in FireFox unless there were actual titles added to every link.

July 26th, 2014|Wordpress Tutorials|

Missing Spell Checker

Without even noticing it until someone mentioned it, did I realise that our spell checker in WordPress was missing. I double checked and nope, it definitely was not there.. I even checked Ultimate TinyMCE to see if there was a checker hiding in there… but no….

Missing Spell CheckerI remembered out of habit that I would normally just right click on the word that had a red wavy line under it and I could check my spelling that way. I did this out of habit like I said so didn’t even realise that the feature was missing from the WordPress editor / kitchen sink feature.

Missing Spell Checker HelpTo check your spelling right click on the word with the red wavy line and a drop down will appear giving you various spelling options. Choose the one you would like to use and the red wavy line will go away.

However if you decide that the spelling is correct and you want to leave it that way, Add the Word to the dictionary and next time it will be there for you. This will help especially if you are in Australia and WordPress tries to give you the US version of a word.

July 12th, 2014|Wordpress Tutorials|